Wednesday, 30 July 2014

1 Android Startup

I know you all are excited to start developing your own app. Here are some steps that you must take before developing your first android app.

 1. Learn basics of Java (Classes and objects)

 2. Download JDK 6 (JRE alone is not sufficient) and install it.

 3. Download Eclipse ADT with Android SDK for Windows  64bit or 32bit

 4. Extract the zip file and run Eclipse.

5. Now Explore yourself inside the window.


Click here to move ahead.

Do comment below for any Queries

Tuesday, 29 July 2014

2 Know your Eclipse

Hope Eclipse runs on your computer , it will show a window similar to this.


Lets explore about different panes inside the eclipse window and learn about functions of each of them.

  1. Package Explorer: Shows all the Project in your current workspace. The red cross mark on the icon of a project shows that it contains error(s).
  2. Tool Bar: contains all the shortcuts for the tools that are generally required during development. Some important tools are run , debug, breakpoint etc.
  3. This is your working area. Shows the content of current file and contains all the opened file in tabs at top.
  4. Palette: Contains some predefined layouts, and graphical objects like buttons and text box. This is only visible if a graphical layout of a xml file is opened.
  5. Side Bar: contains Outline of current file and properties of current selected object.
  6. This area contains some of the important tools like console and logcat. Console is like a chat window where Eclipse tells you what it is doing. While Logcat contains list of log reports. We will explore about them later.
So now you know your Eclipse, so lets do some setup before starting your first project.
 

3 Create a Virtual Device

To test your Android applications you will need a virtual Android device. So before we start writing our code, let us create an Android virtual device.


So here we go!!

After opening your Eclipse Window....
Step 1: User left click on "Android Virtual Device Manager (button)"                                                  


Step 2: User left click on "New... (button)"                                                                                            

Step 3: Now give a name to your device emulator and select some predefined device names with their configurations.


Step 4:  User left click on "OK (button)"                                                                                            


Step 5:  Select your device from list                                                                                                  

Step 12: Left click on "Start... (button)"                                                                                                  


Thats it !!
Now you have an emulator which will take take some time to load and in the end will look like this


If your AVD is created successfully it means your environment is ready for Android application development. If you like, you can close this window using top-right cross button. Better you re-start your machine and once you are done with this last step, you are ready to proceed for your first Android project
 

4. Hello World

Hope you have successfully created a virtual device on your system and are familiar with basic with your Eclipse window. Now you are ready to start a new project. Steps are given below with the need of each . Tips and tricks are included wherever required.

So open your Eclipse and follow !!.


  1. Go to file menu, under New section click on 'Android application project'. A window will be opened as shown below.Now fill the details as you want.
    1.  App name: the name you want to give to your App.
    2.  Project Name: it will be filled automatically, but you can change if you want.
    3.  Package Name: it will e filled automatically, but you can change if you want.(don't use   co.example.*    if want to publish your app)
    4. Min required SDK: the oldest version of android that may be able to run this app.
    5. Target SDK: the version of android for which you are developing your app.
    6. Compile with: Choose the version you have selected above (target SDK) .
    7. Theme: there are some template theme available in SDK,You can choose any of them or choose none.
    8. Click on next.
  2.  Now you will see screen like this. Leave the settings to default. This enables you to make your own App icon and activity in further steps. Click next.
  3. Now you are on Launcher Icon setup. choose a icon for your app using the options provided. You can choose a text, a clip art or from a image file.
  4. Now you have to select the type of activity.
    1. Blank Activity creates a normal activity (Activity -display area of your screen).
    2. Fullscreen Activity: Notification area is not visible. Generally used for games.
    3. Master /detail flow: Like a wizard window. Wizard window -the one like you ae using now on Eclipse.
  5.  Now you have to enter details for your Activity. Enter any name you want. Fragment Activity is pat of your Activity. You can design fragment which gets super imposed on your main Activity. Though you can design your main Activity separately.Navigation type is the type of navigation gestures you want to switch between your activities.
  6.  content of your fragment.xml file
    1. <RelativeLayout xmlns:android="http://schemas.android.com/apk/res/android"
          xmlns:tools="http://schemas.android.com/tools"
          android:layout_width="match_parent"
          android:layout_height="match_parent"
          android:paddingBottom="@dimen/activity_vertical_margin"
          android:paddingLeft="@dimen/activity_horizontal_margin"
          android:paddingRight="@dimen/activity_horizontal_margin"
          android:paddingTop="@dimen/activity_vertical_margin"
          tools:context="com.example.helloworld.MainActivity$PlaceholderFragment" >

          <TextView
              android:layout_width="wrap_content"
              android:layout_height="wrap_content"
              android:text="@string/hello_world" />

      </RelativeLayout>
  7.  Content of MainActivity.java file:
    1. package com.example.helloworld;

      import android.app.Activity;
      import android.app.ActionBar;
      import android.app.Fragment;
      import android.os.Bundle;
      import android.view.LayoutInflater;
      import android.view.Menu;
      import android.view.MenuItem;
      import android.view.View;
      import android.view.ViewGroup;
      import android.os.Build;

      public class MainActivity extends Activity {

          @Override
          protected void onCreate(Bundle savedInstanceState) {
              super.onCreate(savedInstanceState);
              setContentView(R.layout.activity_main);

              if (savedInstanceState == null) {
                  getFragmentManager().beginTransaction()
                          .add(R.id.container, new PlaceholderFragment()).commit();
              }
          }

          @Override
          public boolean onCreateOptionsMenu(Menu menu) {

              // Inflate the menu; this adds items to the action bar if it is present.
              getMenuInflater().inflate(R.menu.main, menu);
              return true;
          }

          @Override
          public boolean onOptionsItemSelected(MenuItem item) {
              // Handle action bar item clicks here. The action bar will
              // automatically handle clicks on the Home/Up button, so long
              // as you specify a parent activity in AndroidManifest.xml.
              int id = item.getItemId();
              if (id == R.id.action_settings) {
                  return true;
              }
              return super.onOptionsItemSelected(item);
          }

          /**
           * A placeholder fragment containing a simple view.
           */
          public static class PlaceholderFragment extends Fragment {

              public PlaceholderFragment() {
              }

              @Override
              public View onCreateView(LayoutInflater inflater, ViewGroup container,
                      Bundle savedInstanceState) {
                  View rootView = inflater.inflate(R.layout.fragment_main, container,
                          false);
                  return rootView;
              }
          }

      }
  8. Explanation of above code is done here.
  9. The fragment.xml can be edited graphically too. This will be updated here soon!!.
  10. Now you are done with coding Part too. Its time to build and run your project. Now go to Project menu and click on Clean. This rebuilds your project and refreshes all the linked files. Sometimes you see many errors Related 'R' Class, this step generally solves this problem. More Info will be given on R class in further posts.
  11. Now select 'Clean Projects selected below' and tick your project (helloWorld here). This will only build the selected projects else you end up updating all your projects in your workspace which eats up lots of time. 
  12.  Now select your project in project explorer (generally on left side of the window ) and the click on run (Either on menubar or on the toolbar). Then you will see another window as shown below. Now select 'Android Application' and click on 'OK'
  13.  Now select your AVD (Android Virtual Device) that you have already created (if not then click here) if prompted. Now your Virtual device will be loaded and will run your Application when its ready. You may need to unlock the phone (AVD) to see your Application Activity.


Note : If AVD doesn't launches your application even after unlocking and you see error like "connection lost" in console. Then you may have to repeat last two steps again.

Feel free to give any suggestions and reviews. For any doubt comment below.

5 UI-Layout

Understanding layouts is important for good Android application design. In this tutorial, we provide an overview of how layouts fit into the Android application architecture. We also explore some of the specific layout controls available for organizing application screen content in a variety of interesting ways.

Android developers use the term layout to mean one of two things. Both definitions apply to this tutorial, and are, unfortunately used interchangeably in the Android development community. The two definitions of layout are:
  • A type of resource that defines what is drawn on the screen. Layout resources are stored as XML files in the /res/layout resource directory for the application. A layout resource is simply a template for a user interface screen, or portion of a screen, and contain.
  • A type of View class whose primary purpose is to organize other controls. These layout classes (LinearLayout, RelativeLayout, TableLayout, etc. ) are used to display child controls, such as text controls or buttons or images on the screen.
Android user interfaces can be defined as layout resources in XML or created programmatically.

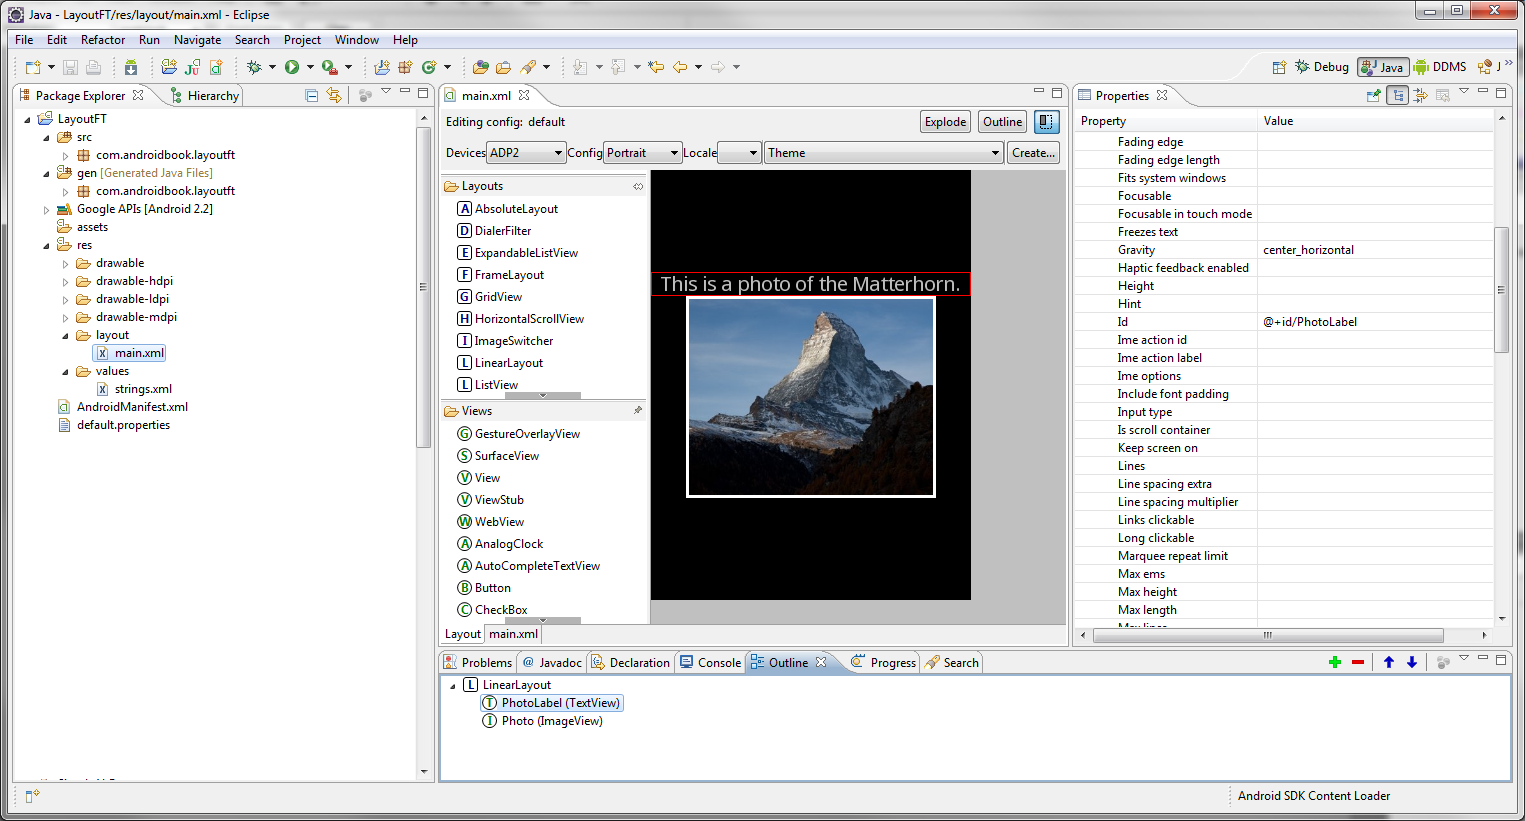
The Android Development Plug-in for Eclipse includes a handy layout resource designer for designing and previewing layout resources. The tool includes two tab views: the Layout view allows you to preview how the controls will appear on various screens and for each orientation and the XML view shows you the XML definition of the resource. The layout resource designer is shown in this figure:
Layout figure 1
Here are some tips for working with the layout resource designer in Eclipse:
  • Use the Outline pane to Add and Remove controls to your layout resource.
  • Select a specific control (either in the Preview or the Outline) and use the Property pane to adjust a specific control’s attributes.
  • Use the XML tab to edit the XML definition directly.
It’s important to remember that the Eclipse layout resource designer preview can’t replicate exactly how the layout will appear to end users. For this, you must test your application on a properly configured emulator and, more importantly, on your target devices. Also, certain “complex” controls, including tabs or video viewers, cannot be previewed within Eclipse.

Layouts and XML: The basics

The basic Android approach to layout is to set it up in XML, in a layout file that is usually found in res/layout/. It's also possible to then grab and alter that layout information programmatically at runtime as your app requires. (It's also possible simply to instantiate your layout information at runtime, but that's less flexible and maintainable than using XML, and I won't cover it here.)
The structure of an XML layout file is similar to the structure of an HTML webpage -- you can think of it as a series of nested elements, or as a tree. Each layout file has one single root element, which must be a View or ViewGroup element (such as LinearLayout, RelativeLayout, ListView...). The limitations of the arrangements of the child elements (panes, buttons, images, text... all the visual parts of your app) will vary according to the specific root element. Let's look at what we can do with a LinearLayout.

LinearLayout: The basics

A LinearLayout is a very simple layout that just arranges all its children in either a vertical column, or a horizontal row, depending on how it is specified. A vertical LinearLayout will only have one child per row (so it is a column of single elements), and a horizontal LinearLayout will only have one single row of elements on the screen. There are obvious disadvantages to this for more complicated apps -- you probably don't want all your buttons to line up one under the other, for example. To set up more complicated arrangements, you'll probably want to use a RelativeLayout (which we'll look at in another tutorial); we'll also have a quick look at nesting LinearLayouts at the bottom of this tutorial.
Here's a basic vertical LinearLayout. Create a new Android project, LayoutTest, and put this in res/layout/activity_layout_test.xml:

<?xml version="1.0" encoding="utf-8"?>
<LinearLayout xmlns:android="http://schemas.android.com/apk/res/android"
    android:layout_width="fill_parent"
    android:layout_height="fill_parent"
    android:orientation="vertical" >
    <TextView
        android:layout_width="fill_parent"
        android:layout_height="wrap_content"
        android:text="@string/hello" />
    <EditText
        android:layout_width="fill_parent"
        android:layout_height="wrap_content"
        android:hint="@string/name" />
    <Button
        android:layout_width="100dp"
        android:layout_height="wrap_content"
        android:text="@string/setName" />
</LinearLayout>
android linearlayout  
 
It's good practice to keep your strings in a resource file, rather than hard-coding them into your layout. This makes for easier internationalisation, and is more maintainable. So you'll also need to edit res/values/strings.xml:

<resources>
    <string name="app_name">LayoutTest</string>
    <string name="hello">Hello world!</string>
    <string name="name">Name</string>
    <string name="setName">Set name</string>
</resources>


As you'll see , you can refer to Android string resources with @string/stringname. This is a standard format which we'll see used for other resources in due course.
To make this show up on the screen, you'll also need to edit src/com/example/layouttest/LayoutTestActivity.java:

package com.example.layouttest; public class LayoutTestActivity extends Activity { protected void onCreate(Bundle savedInstanceState) { super.onCreate(savedInstanceState); setContentView(R.layout.activity_layout_test); } } 

Run this (on your phone or on the emulator), and you should get a layout like the one at left. All three elements are laid out one under the other.