Understanding layouts is important for good Android application design. In
this tutorial, we provide an overview of how layouts fit into the
Android application architecture. We also explore some of the specific
layout controls available for organizing application screen content in a
variety of interesting ways.
 Here are some tips for working with the layout resource designer in Eclipse:
The structure of an XML layout file is similar to the structure of an HTML webpage -- you can think of it as a series of nested elements, or as a tree. Each layout file has one single root element, which must be a View or ViewGroup element (such as LinearLayout, RelativeLayout, ListView...). The limitations of the arrangements of the child elements (panes, buttons, images, text... all the visual parts of your app) will vary according to the specific root element. Let's look at what we can do with a LinearLayout.
Here's a basic vertical LinearLayout. Create a new Android project, LayoutTest, and put this in res/layout/activity_layout_test.xml:
package com.example.layouttest; public class LayoutTestActivity extends Activity { protected void onCreate(Bundle savedInstanceState) { super.onCreate(savedInstanceState); setContentView(R.layout.activity_layout_test); } }
Run this (on your phone or on the emulator), and you should get a layout like the one at left. All three elements are laid out one under the other.
What Is A Layout?
Android developers use the term layout to mean one of two things. Both definitions apply to this tutorial, and are, unfortunately used interchangeably in the Android development community. The two definitions of layout are:- A type of resource that defines what is drawn on the screen. Layout resources are stored as XML files in the /res/layout resource directory for the application. A layout resource is simply a template for a user interface screen, or portion of a screen, and contain.
- A type of View class whose primary purpose is to organize other controls. These layout classes (LinearLayout, RelativeLayout, TableLayout, etc. ) are used to display child controls, such as text controls or buttons or images on the screen.
Using Eclipse to Design Layout Resources
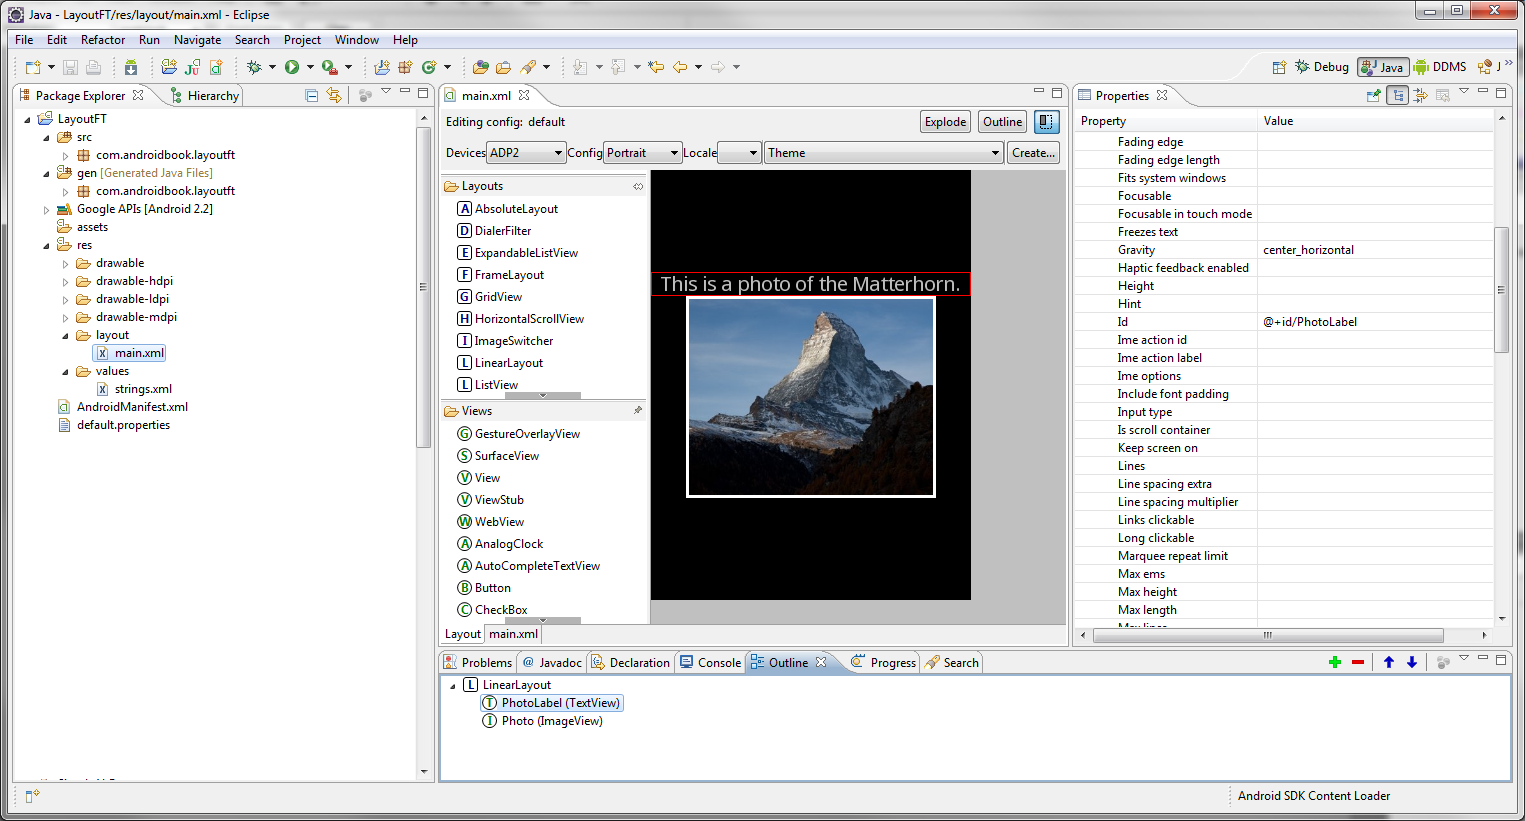
The Android Development Plug-in for Eclipse includes a handy layout resource designer for designing and previewing layout resources. The tool includes two tab views: the Layout view allows you to preview how the controls will appear on various screens and for each orientation and the XML view shows you the XML definition of the resource. The layout resource designer is shown in this figure:
- Use the Outline pane to Add and Remove controls to your layout resource.
- Select a specific control (either in the Preview or the Outline) and use the Property pane to adjust a specific control’s attributes.
- Use the XML tab to edit the XML definition directly.
Layouts and XML: The basics
The basic Android approach to layout is to set it up in XML, in a layout file that is usually found in res/layout/. It's also possible to then grab and alter that layout information programmatically at runtime as your app requires. (It's also possible simply to instantiate your layout information at runtime, but that's less flexible and maintainable than using XML, and I won't cover it here.)The structure of an XML layout file is similar to the structure of an HTML webpage -- you can think of it as a series of nested elements, or as a tree. Each layout file has one single root element, which must be a View or ViewGroup element (such as LinearLayout, RelativeLayout, ListView...). The limitations of the arrangements of the child elements (panes, buttons, images, text... all the visual parts of your app) will vary according to the specific root element. Let's look at what we can do with a LinearLayout.
LinearLayout: The basics
A LinearLayout is a very simple layout that just arranges all its children in either a vertical column, or a horizontal row, depending on how it is specified. A vertical LinearLayout will only have one child per row (so it is a column of single elements), and a horizontal LinearLayout will only have one single row of elements on the screen. There are obvious disadvantages to this for more complicated apps -- you probably don't want all your buttons to line up one under the other, for example. To set up more complicated arrangements, you'll probably want to use a RelativeLayout (which we'll look at in another tutorial); we'll also have a quick look at nesting LinearLayouts at the bottom of this tutorial.Here's a basic vertical LinearLayout. Create a new Android project, LayoutTest, and put this in res/layout/activity_layout_test.xml:
<?xml version="1.0" encoding="utf-8"?>
<LinearLayout xmlns:android="http://schemas.android.com/apk/res/android"
    android:layout_width="fill_parent"
    android:layout_height="fill_parent"
    android:orientation="vertical" >
    <TextView
        android:layout_width="fill_parent"
        android:layout_height="wrap_content"
        android:text="@string/hello" />
    <EditText
        android:layout_width="fill_parent"
        android:layout_height="wrap_content"
        android:hint="@string/name" />
    <Button
        android:layout_width="100dp"
        android:layout_height="wrap_content"
        android:text="@string/setName" />
</LinearLayout>
It's good practice to keep your strings in a resource file, rather than hard-coding them into your layout. This makes for easier internationalisation, and is more maintainable. So you'll also need to edit res/values/strings.xml:
<resources>
    <string name="app_name">LayoutTest</string>
    <string name="hello">Hello world!</string>
    <string name="name">Name</string>
    <string name="setName">Set name</string>
</resources>
As you'll see , you can refer to Android string resources with
To make this show up on the screen, you'll also need to edit src/com/example/layouttest/LayoutTestActivity.java:@string/stringname. This is a standard format which we'll see used for other resources in due course.
package com.example.layouttest; public class LayoutTestActivity extends Activity { protected void onCreate(Bundle savedInstanceState) { super.onCreate(savedInstanceState); setContentView(R.layout.activity_layout_test); } }
Run this (on your phone or on the emulator), and you should get a layout like the one at left. All three elements are laid out one under the other.
No comments:
Post a Comment